Wednesday, August 31, 2011

Using TransactionScope or DbTransaction in LINQ to SQL

LINQ to SQL supports SQL transaction and in many cases calling SubmitChanges() method is enough to finalize the batch transaction. However, there are cases when you need explicit transaction handling.

Note: the following examples assume that we're connecting to remote SQL Server because when connecting to remote SQL, we sometimes have to consider MSDTC involvement for distributed transactions.

Example (1) below is the case you need explicit transaction. For testing purpose, I added if-statement in the middle and threw the exception. When an exception is thrown, if you check SQL Server table, you will notice that data is removed by sp_delete() method (this is a LINQ to SQL method that calls SQL Stored Procedure). So even if we didn't call SubmitChanges() method, data transaction can occur, so need to have explicit transaction.

//Example (1)
public void SaveWithoutTransaction()
{
   DataClasses1DataContext db = new DataClasses1DataContext();
   db.Connection.Open();

   int id = 10;
   db.sp_delete(id);

   if (id == 10) throw new ApplicationException(); //<== Testing 

   Tab1 t1 = new Tab1();
   t1.Id = id;
   t1.Name = "Tom";
   db.Tab1s.InsertOnSubmit(t1);
   db.SubmitChanges();
}

So for the explicit or manual transaction, we can use TransactionScope or ADO.NET DbTransaction. The Example (2) shows how to use TransactionScope. TransactionScope is simple and easy to use. If running this program, the whole transaction will be rolled back because of if-statement exception. If commenting out testing if-statement, the transaction is successful.

//Example (2)
public void SaveWithTransactionScope()
{
   int id = 10;
   DataClasses1DataContext db = new DataClasses1DataContext();
   using (TransactionScope trans = new TransactionScope())
   {
      db.sp_delete(id);

      if (id == 10) throw new ApplicationException(); // testing 

      Tab1 t1 = new Tab1();
      t1.Id = id;
      t1.Name = "Tom";
      db.Tab1s.InsertOnSubmit(t1);
      db.SubmitChanges();

      trans.Complete();
   }
}

And also if I run sp_lock against SQL Server to check table lock status, I can see the row is locked exclusively.

sp_lock result
55 7 2105058535 0 TAB IX
55 7 2105058535 1 KEY (d08358b1108f) X
55 7 2105058535 1 PAG 1:157 IX

now let's do some experiment here. I added another DataContext in the middle and called SubmitChanges() for the db2 DataContext.

// Example (3)
public void SaveWithTransactionScope()
{
   int id = 10;
   DataClasses1DataContext db = new DataClasses1DataContext();
   using (TransactionScope trans = new TransactionScope())
   {
      db.sp_delete(id);

// let's use another instance of DataContext
      DataClasses1DataContext db2 = new DataClasses1DataContext();
      Tab2 t2 = new Tab2();
      t2.Id = 1;
      t2.Name = "aaa";
      db2.Tab2s.InsertOnSubmit(t2);
      db2.SubmitChanges();  //<== Error occurs here

      Tab1 t1 = new Tab1();
      t1.Id = 10;
      t1.Name = "Tom";
      db.Tab1s.InsertOnSubmit(t1);
      db.SubmitChanges();

      trans.Complete();
   }
}

Then, I got the following SqlException.

     MSDTC on server 'MyServer1' is unavailable.

The reason is when you have multiple DataContexts, MSDTC is involved so you need to start MSDTC service on remote SQL Server machine. (if you are connecting to local SQL Server, you won't have the error)

Basically if you have multiple data contexts, you need to use MSDTC.
However, the restriction that you have to start MSDTC service on your remote SQL Server might not be possible in some cases. If you cannot (or don't want to) start MSDTC inevitably, you can try a kind of trick using manual transaction with DbTransaction. Here is how to. First, get DbTransaction object from Connection.BeginTransaction() and use Commit at the bottom of try block and Rollback method in the catch block. If db2 (DataClasses1DataContext object) throws an exception due to an error, catch block will rollback previously-ran db transaction.

Example (4)
public void SaveWithDbTransaction()
{         
   DbTransaction trans = null;
   DataClasses1DataContext db = new DataClasses1DataContext();
   try
   {
      db.Connection.Open();
      trans = db.Connection.BeginTransaction();
      db.Transaction = trans;

      int id = 10;
      db.sp_delete(id);

      DataClasses1DataContext db2 = new DataClasses1DataContext();
      Tab2 t2 = new Tab2();
      t2.Id = 1;
      t2.Name = "Jim";
      db2.Tab2s.InsertOnSubmit(t2);
      db2.SubmitChanges();  // if errors, it goes to catch block
            
      Tab1 t1 = new Tab1();
      t1.Id = id;
      t1.Name = "Tom";
      db.Tab1s.InsertOnSubmit(t1);
      db.SubmitChanges();

      trans.Commit();
   }
   catch (Exception ex)
   {
      if (trans != null)
      {
         trans.Rollback();
      }
      throw ex;
   }
   finally
   {
      if (db.Connection != null && 
         db.Connection.State == System.Data.ConnectionState.Open)
      {
         db.Connection.Close();
      }
   }
}
Tuesday, August 23, 2011

How to use FILESTREAM

In order to use FILESTREAM, there are couple of steps that should be done before start using it. Here are steps to set it up and use FILESTREAM feature in SQL Server.

Enable FILESTREAM in SQL Server Service

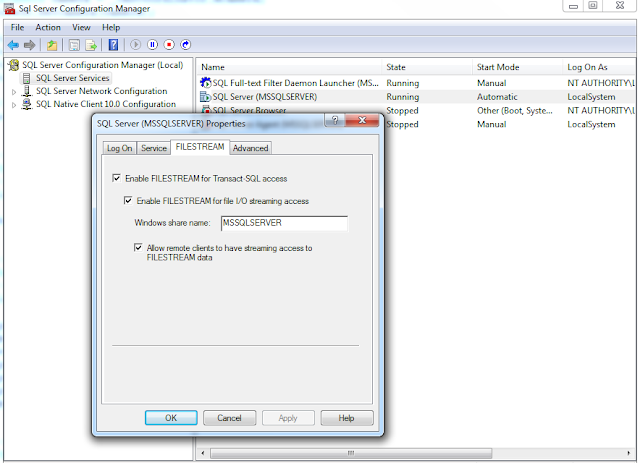
First, FILESTREAM should be enabled in SQL Server. This can be done by either using SQL Configuration Manager or SQL WMI. The following picture shows how to set it up in SQL Configuration Manager.

(1) Doubleclick SQL Server Service. In this example, it's SQL Server(MSSQLSERVER).
(2) Click FILESTREAM tab
(3) Click checkbox(ex) to enable features.
(4) Click OK


Set SQL Server property [Filestream Access Level]
There is a SQL Server property called Filestream Access Level which is disabled by default. There is 3 options for this access level : Disabled, TSQL access enabled, Full access enabled.

NOTE: Filestream data can be accessed either from TSQL or from external Win32 API. If you want to access FileStream from both TSQL and Win32, you have to select [Full access enabled].


(1) Rum SSMS.exe
(2) Connect to SQL Server
(3) In Object Explorer, rightclick Server node and select [Properties]
(4) In [Server Properties] dialog, click [Advanced]
(5) Change [Filestream Access Level]
(6) Click OK


Create FILESTREAM enabled Database

To use FILESTREAM, a Database should have separate FileGroup which is dedicated to FILESTREAM. So when creating a database, FILESTREAM filegroup should be included in DDL.

In SSMS, this task can be done in the following steps.

(1) Run SSMS.exe
(2) Connect to SQL Server
(3) In Object Explorer, rightclick Databases node and choose [New Database...]


(4) Type a DB name
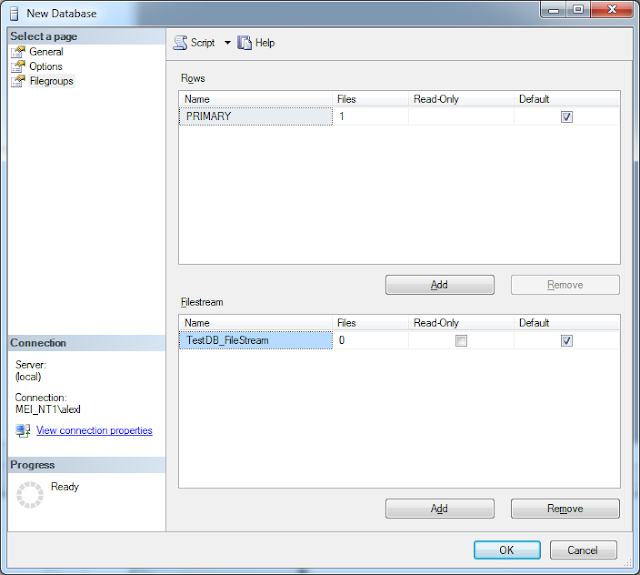
(5) Click [Filegroups]


(6) Click [Add] button under FileStream grid
(7) Type FileStream name
(8) Click [General]


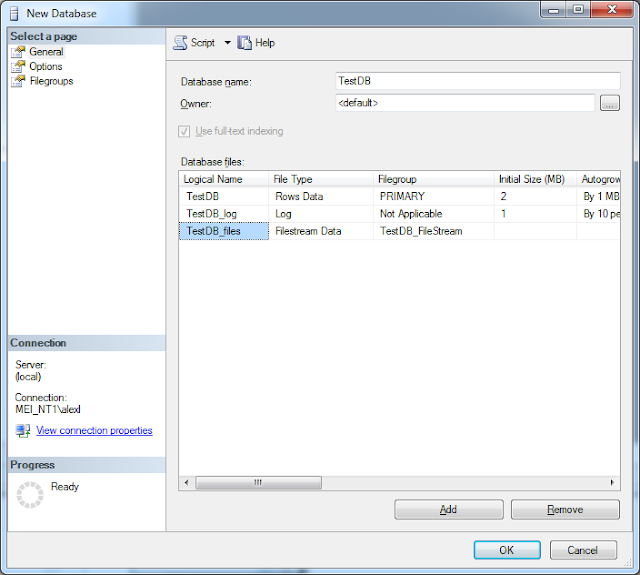
(9) In General tab, click [Add] and type new database file name (ex: TestDB_files) and select [Filestream Data] from File Type column. Select filegroup if needed.

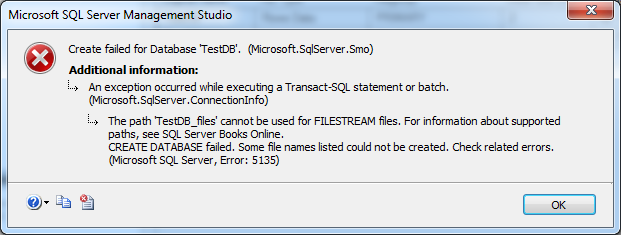
(10) If you click OK here, you will see the following error message:
        "The path cannot be used for FILESTREAM files."
        "CREATE DATABASE failed. Some file names listed could not be created. Check related errors.
         (Microsoft SQL Server, Error: 5135)"


    This error occurs since you don't specify file path for the filestream database file.

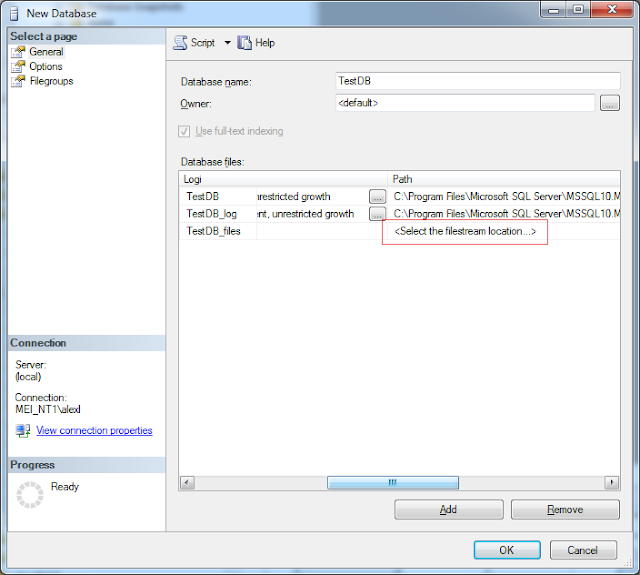
(11) Move Horizontal scroll bar to the right and find <Select the filestream location...>


     Set the Path value and click OK. Now, FILESTREAM enabled database will be created correctly.


Create FILESTREAM enabled Table

In SQL Server 2008 and 2008 R2, SSMS does not support FILESTREAM attribute in CREATE TABLE designer. That means you cannot create a table that has FILESTREAM column by using SSMS. So TSQL is used to create FILESTREAM enabled table.
CREATE TABLE FSTable
(
   -- ROWGUID column is required
   [RowId] [uniqueidentifier] ROWGUIDCOL NOT NULL UNIQUE,     
   [Id] int NOT NULL,
   -- This is FILESTREAM column
   [Data] VARBINARY(MAX) FILESTREAM NULL  
)


Using FILESTREAM Table with TSQL

FileStream table can be used or handled just like other table. This means we can treat FileStream column as normal varbinary column. One can select, insert, update, delete the same way as other table. Here are some examples of DML statements.

(1) INSERT
INSERT FSTable VALUES (NEWID(), 1, CAST('Hello, World' AS varbinary(max)))
INSERT FSTable VALUES (NEWID(), 2, CAST('' AS varbinary(max)))

(2) UPDATE
UPDATE FSTable SET Data=CAST('ABC' AS varbinary(max)) 
WHERE [Id]=1

(3) DELETE
DELETE FSTable WHERE [Id]=2

(4) SELECT
SELECT Data FROM FSTable

Result of  "SELECT Data.PathName() FROM FSTable WHERE [Id]=1"
file://server1/MSSQLSERVER/v1/TestDB/dbo/FSTable/Data/EC2821EA-6C4B-4638-8C7B-A42649F0746D

Using FILESTREAM Table in ADO.NET
One way of accessing FILESTREAM data is through normal SQL data access layer such as ADO.NET. In this case, SQL Server handles FILESTREAM data access in the middle. The same TSQL statements above are used in ADO.NET. A sample can be found in http://sqlbeyond.blogspot.com/2011/09/import-binary-data-to-filestream-column.html

Using FILESTREAM with SqlFileStream
Namespace System.Data.SqlTypes contains SqlFileStream class which provides read/write functions for FILESTREAM in native mode. Unlike ADO.NET access method, the SqlFileStream directly access file system so the performance is faster. SqlFileStream constructor requires FILESTREAM PathName and current transaction context (these are common requirement for FILESTREAM when using Win32). Here is an example.

using System;
using System.IO;
using System.Data.SqlClient;
using System.Data.SqlTypes;
using System.Text;

namespace MyFile
{
   class Program
   {
      static void Main(string[] args)
      {
         string connStr = "Data Source=.;Integrated Security=true;Initial Catalog=TestDB";
         using (SqlConnection conn = new SqlConnection(connStr))
         {
            conn.Open();

            string sql = "SELECT Data.PathName() FROM FSTable WHERE [Id]=1";
            SqlCommand cmd = new SqlCommand(sql, conn);
            object path = cmd.ExecuteScalar();
            if (path == DBNull.Value) throw new InvalidOperationException();

            SqlTransaction tx = conn.BeginTransaction();
            cmd.Transaction = tx;

            sql = "SELECT GET_FILESTREAM_TRANSACTION_CONTEXT()";
            cmd.CommandText = sql;
            byte[] txCtx = cmd.ExecuteScalar() as byte[];

            SqlFileStream sqlFS = new SqlFileStream(path.ToString(), txCtx, FileAccess.ReadWrite);
            byte[] bytes = new byte[1024];
            int nbytes = sqlFS.Read(bytes, 0, bytes.Length);
            if (nbytes > 0)
               Console.WriteLine(Encoding.ASCII.GetString(bytes));

            sqlFS.Close();
            tx.Commit();
         }
      }
   }
}

Friday, August 12, 2011

How to redirect SQL Server without modifying .NET config file

For desktop .NET application, .config file is automatically generated from App.config. That is, every time developers rebuilds the .NET application/solution,  new *.exe.config file is generated from the App.config file. Here is an example of connection string section of App.config file:

<connectionStrings>
<add name="MyConnectionString"
connectionString="Data Source=.\SQLEXPRESS;Initial Catalog=TestDB;Integrated Security=True"
providerName="System.Data.SqlClient" />
</connectionStrings>


Once .exe.config file is generated, one can modify the .config file to change SQL Server name. Let's say one might want to put test SQL Server name. So this can be done manually, which is tedious way. Or one can add post build script to overwrite .config file.

There is another way - which is redirecting SQL Server to other server by using SQL Server alias. In some circumstances, this might be a better way.

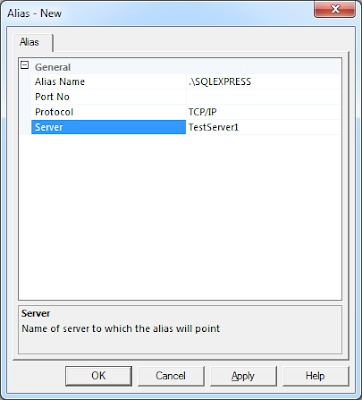
Here is an example of how to redirect .\SQLEXPRESS server to TESTSERVER1 server.


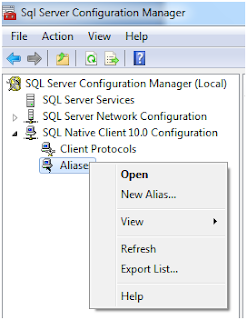
(1)   Run SQL Server Configuration Manager from Windows [Start] menu


(2)   Expand [SQL Native Client 10.0 Configuration] -> [Alias]


(3)   Click [New Alias] and type [Alias Name] and [Server] as follows.


(4)   Click [OK]. Now the application will redirect .\SQLEXPRESS to TESTSERVER1 server.